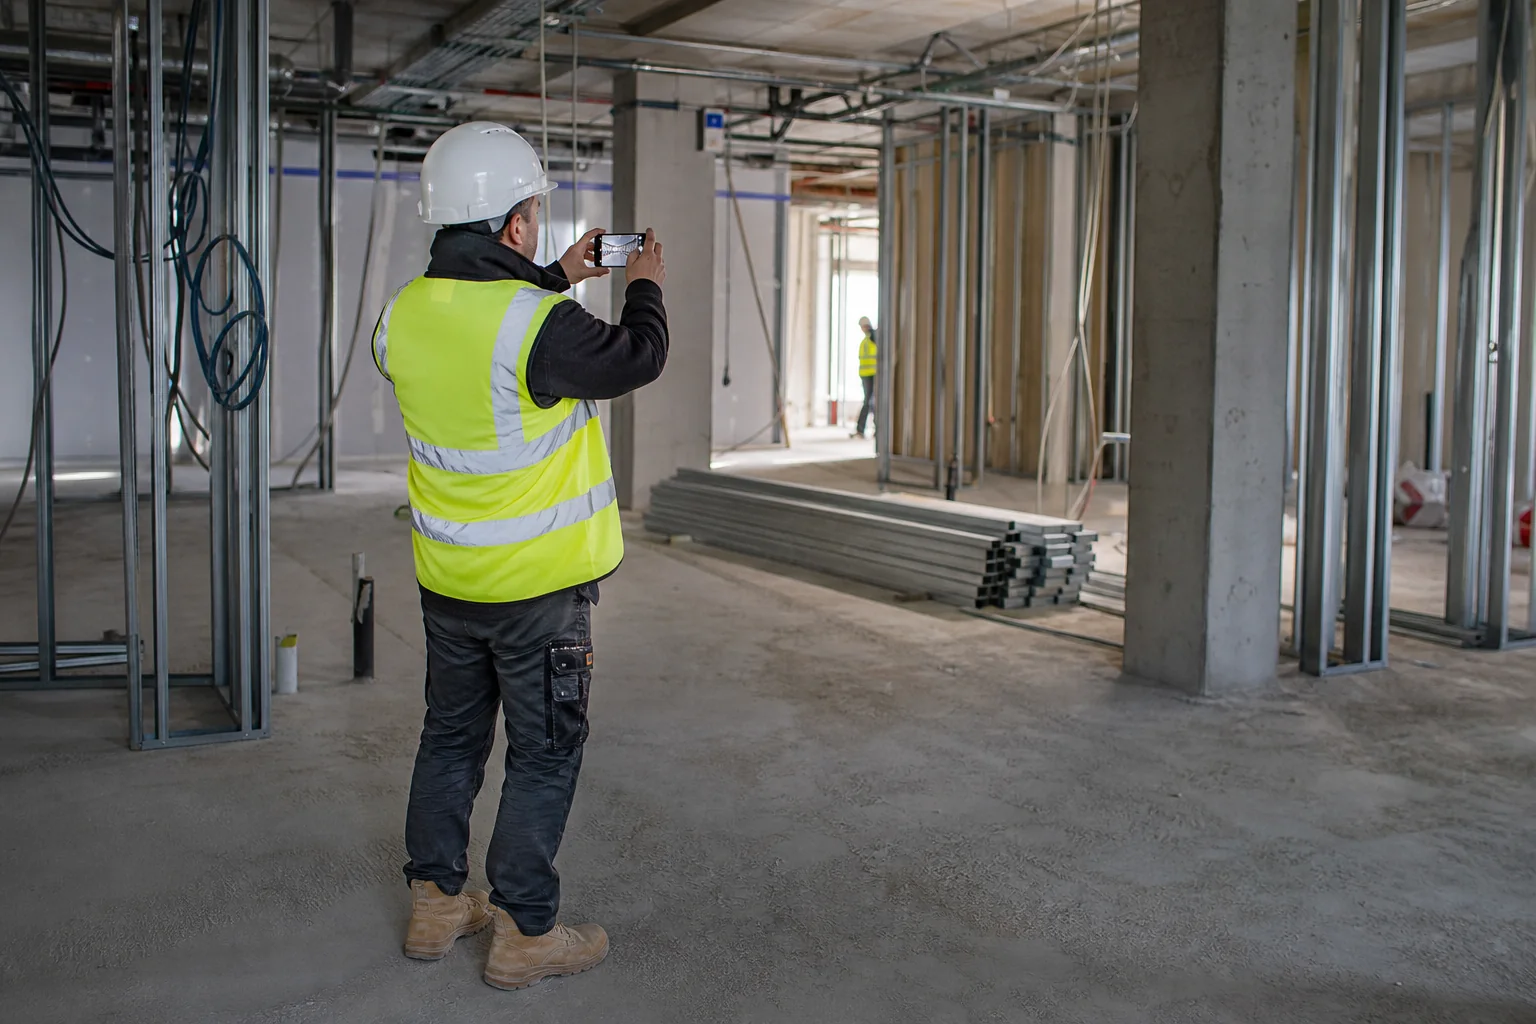
How to use construction photos to review progress and detect issues
A field method for deciding what to photograph, repeating comparable views, separating facts from interpretations, and turning each finding into a verifiable action.
By Enrique Pérez González·
A useful photo has a previous purpose: to show an area, a change, a deviation or the closure of an action.
What a construction photo can prove — and what it cannot
A photograph can demonstrate that a condition was visible from a particular point of view at a particular time, provided the date, original file and context are reliable. It can also help reconstruct a sequence: what was executed, what was left open, when a difference appeared, and how it looked after a repair.
It does not by itself demonstrate the cause of a pathology, complete compliance with the project, an exact measurement, the contractual percentage of an item or the absence of problems outside the framework. The inspection guide Federal Highway Administration recommends that reports be factual, describe specific observations and provide for follow-up; The photos are part of the support, they do not replace the reasoning of the report.
Useful rule: First write the observable fact – «visible dampness in the joint, northern area, 10:30» – and then separate the hypothesis – «possible entry from…» – until it is reviewed by the competent person.
1. Prepare a protocol before taking out your phone
Follow-up fails when each visit depends on what catches your attention that day. Before you begin, create a simple list of zones, landmarks, and risks. It doesn't have to be a complex document: it should allow two different people to produce a comparable file.
Divide the construction site into stable zones
Building, floor, core, dwelling, façade, roof, floor room or section. Use the same names as the drawings, programme and meeting records.
Choose repeatable checkpoints
Define an orientation and physical reference: from the core entrance, a concrete column or a safe corner. For critical areas, save a reference image of the framing.
Match the frequency to the construction pace
A weekly visit may be enough for slow-moving areas; a service that will be concealed must be photographed before close-up. Also photograph before, during and after high-risk work or significant repairs.
Assign responsibility
Define who captures, who reviews, who turns an observation into an issue and who verifies close-out. Without the last step, the archive grows while the issue remains open.
As a formal requirement, Homes England requires that progress photos be clear, give an appropriate perspective of the site and provide sufficient detail to illustrate the points of the report in detail. monitoring report template.
2. Capture from overview to detail
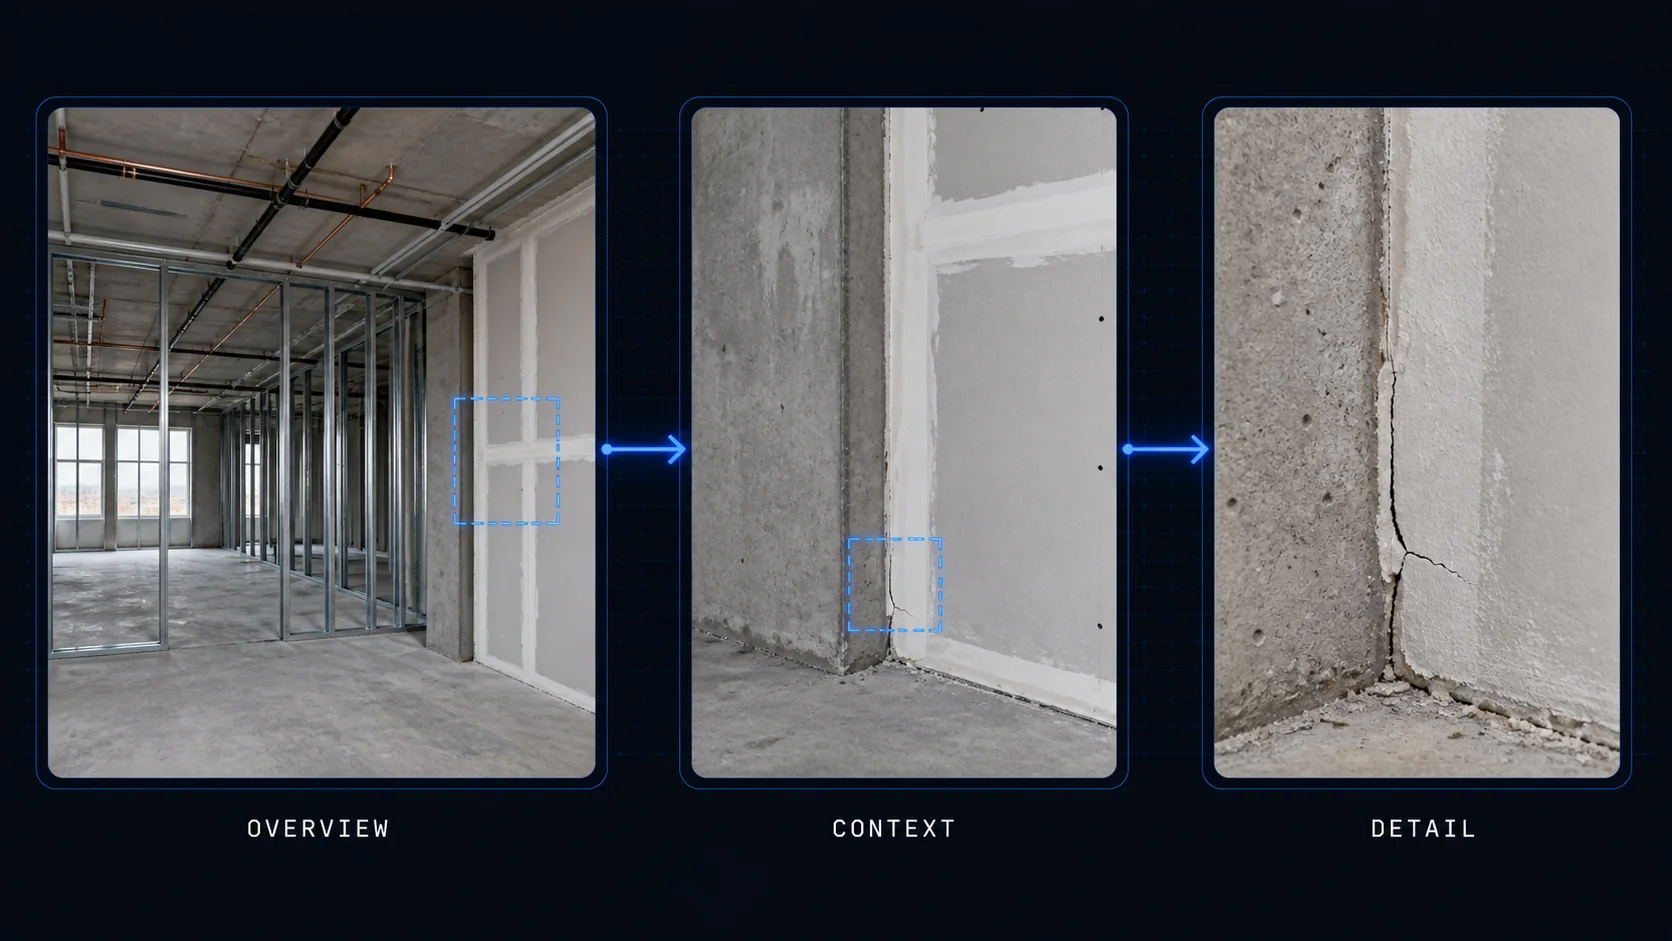
A single close-up photo can show a crack and, at the same time, hide which wall it is on. A single panoramic view locates the wall, but may not allow us to see the fissure. The practical solution is a sequence of three scales.
Scale
What should you answer?
How to capture it
Overview
What area are we in and what is its global status?
Includes stable references: openings, pillars, axes, accesses or facades.
Intermediate context
What element is it and how does it relate to what surrounds it?
Move closer without losing the joint, junction, support, assembly or adjacent section.
Detail
What specific condition should someone else review?
Focus, avoid digital zoom and add a safe scale if the size is relevant.
The photographic protocol of the FHWA for field documentation It precisely proposes a general, medium and close scale tour, in addition to maintaining a record with element, date, image number and comment, and reviewing the quality before leaving the area.
The sequence preserves the location when approaching: first it orients, then it identifies the element and finally it shows the condition. Illustrative diagram generated for this guide.
Minimum quality that prevents a wasted visit
Clean lens, focused image and enough exposure to see the condition.
Original file preserved; avoids relying only on forwarded or compressed captures.
Without aesthetic filters that alter color, contrast or texture.
Consistent orientation and reasonable horizon on repeated views.
Immediate verification of the photo before covering, closing or leaving the area.
3. How to review progress with a comparable sequence
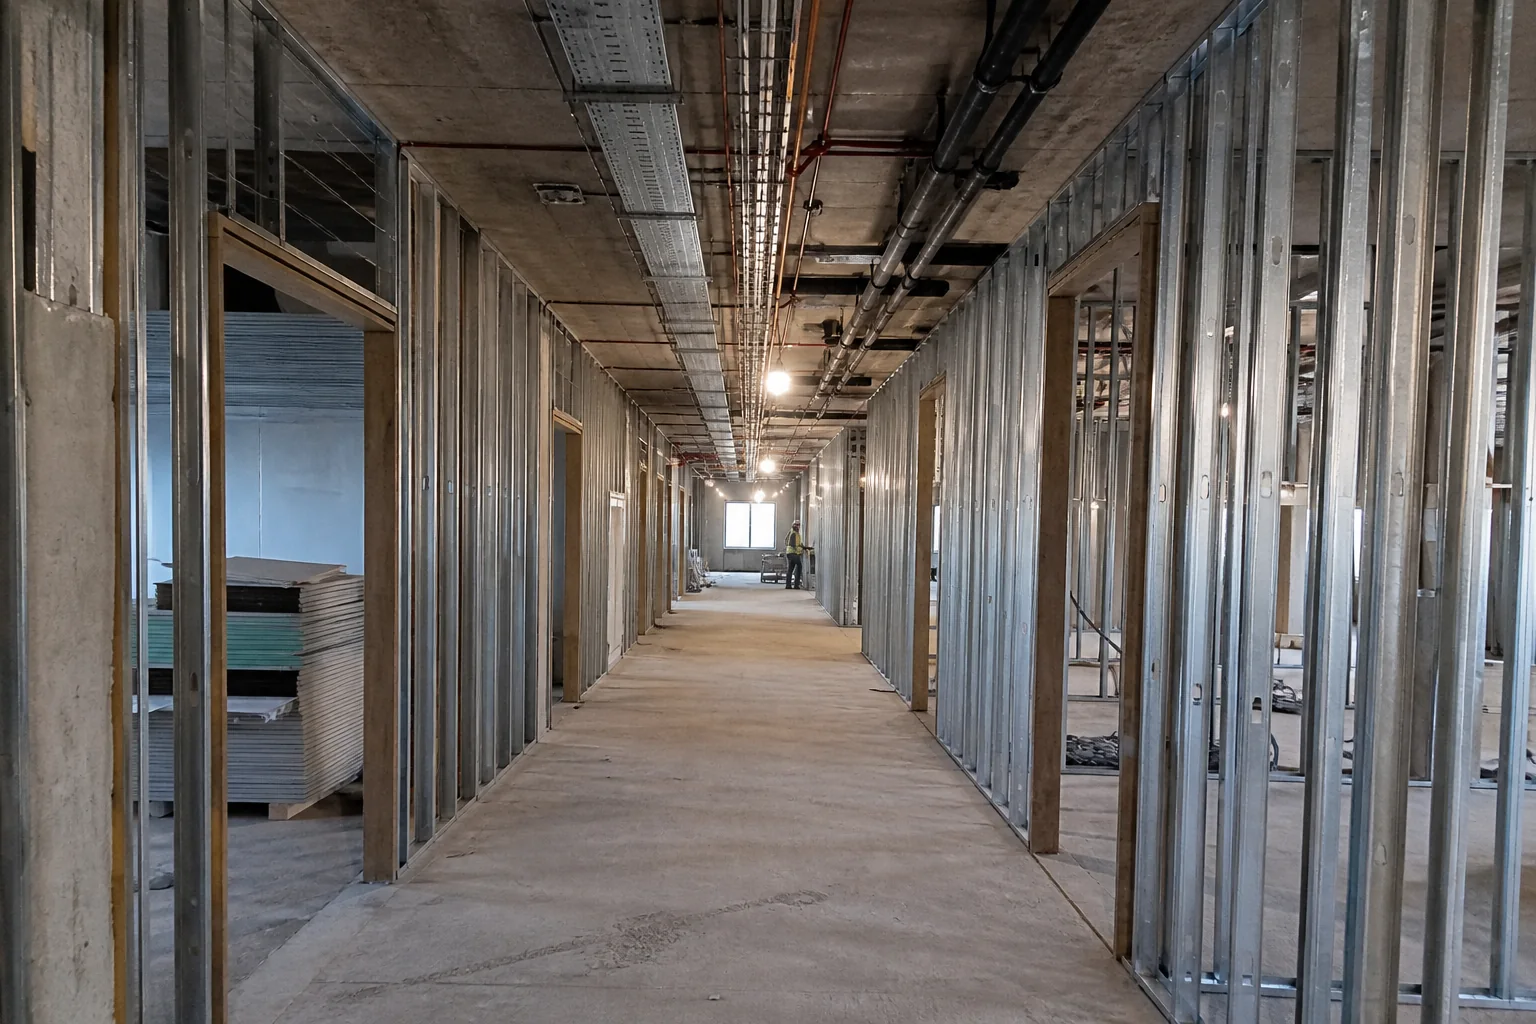
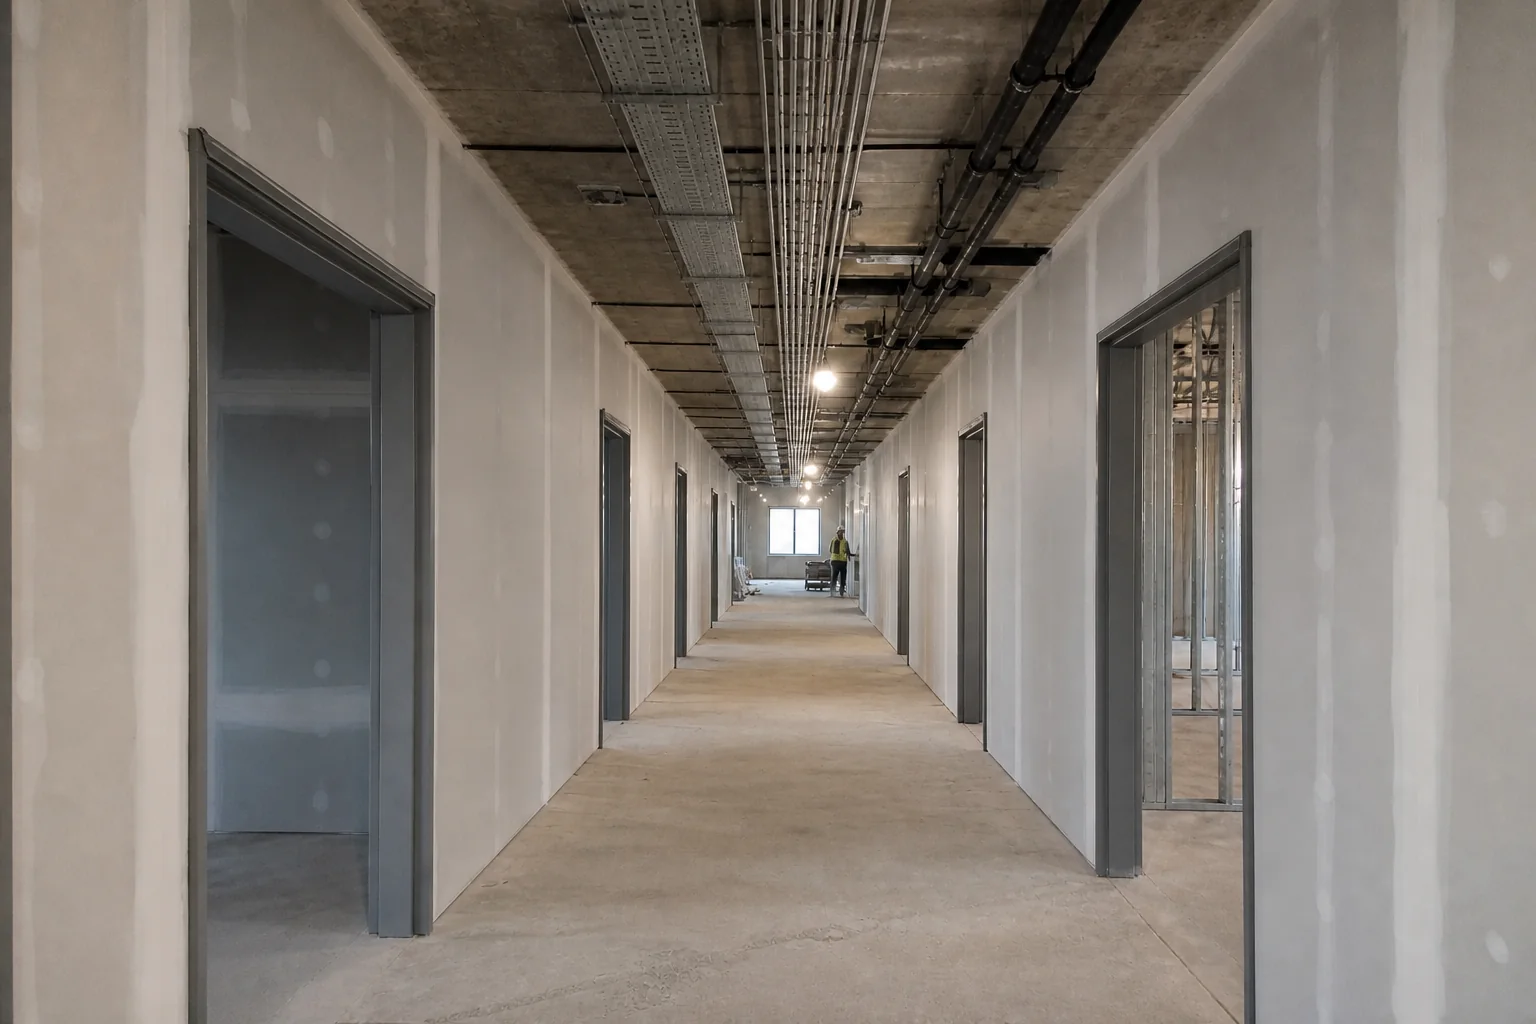
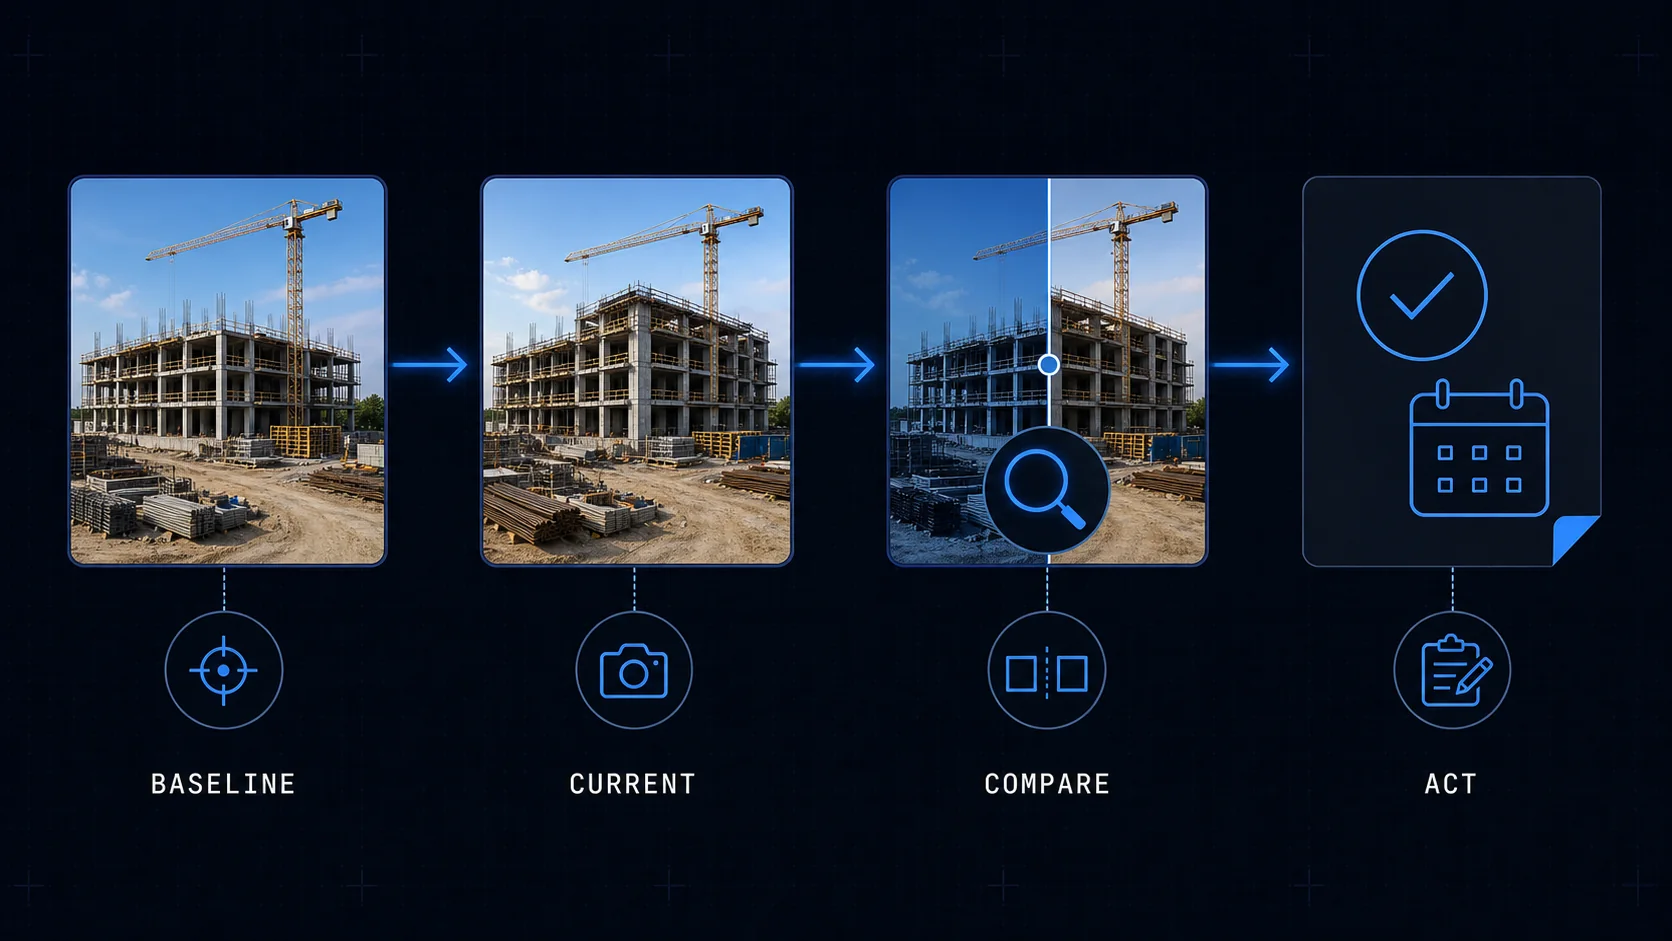
Comparison works when the scene changes but the framing remains almost unchanged. Maintain approximate height, position, orientation and lens. If an area changes a lot, at least preserve permanent structural references – pillars, openings, core or façade – that allow the reviewer to orient himself.
Initial state: open profiles and services under assembly.Later status: plates installed, frames installed and more advanced services.
The comparable point of view allows us to distinguish real progress from a simple change in frame. These images are photographic recreations generated to explain the method.A useful comparison ends in a decision: gather a reference, repeat the capture, contrast the change, and record the next action. Illustrative diagram generated for this guide.
Weekly review routine
1. Filter by period and area
Gathers the last visit and the previous reference of each checkpoint. Don't mix similar floors or fronts without checking the location.
2. Describe what was observed
Separates “executed”, “in progress”, “no visible change” and “not observable”. The absence of a work item in the photo does not prove that it is absent outside the frame.
3. Compare against programme and scope
Compare evidence to current plan, milestones, and measurements. If something seems delayed, check scope and cut-off date before concluding.
4. Record the decision and next check
Write down what needs to be confirmed, who will do it, and when it will be photographed again. The sequence must continue until the doubt is resolved.
Important: A visual comparison may support a certification or production meeting, but does not automatically convert an image into an approved measurement or contractual percentage.
4. How to detect and document issues
Reviewing issues is not just about looking for major damage. It also means detecting differences with plans, incomplete elements, unfinished junctions, removed protections, materials stored in an inappropriate area or a repair that has not been verified.
The American Institute of Architects proposes photographing three categories: deviations from contractual documents, areas with significant progress since the previous visit and general progress. For a deviation it recommends as many angles as necessary and a scale reference when size matters.
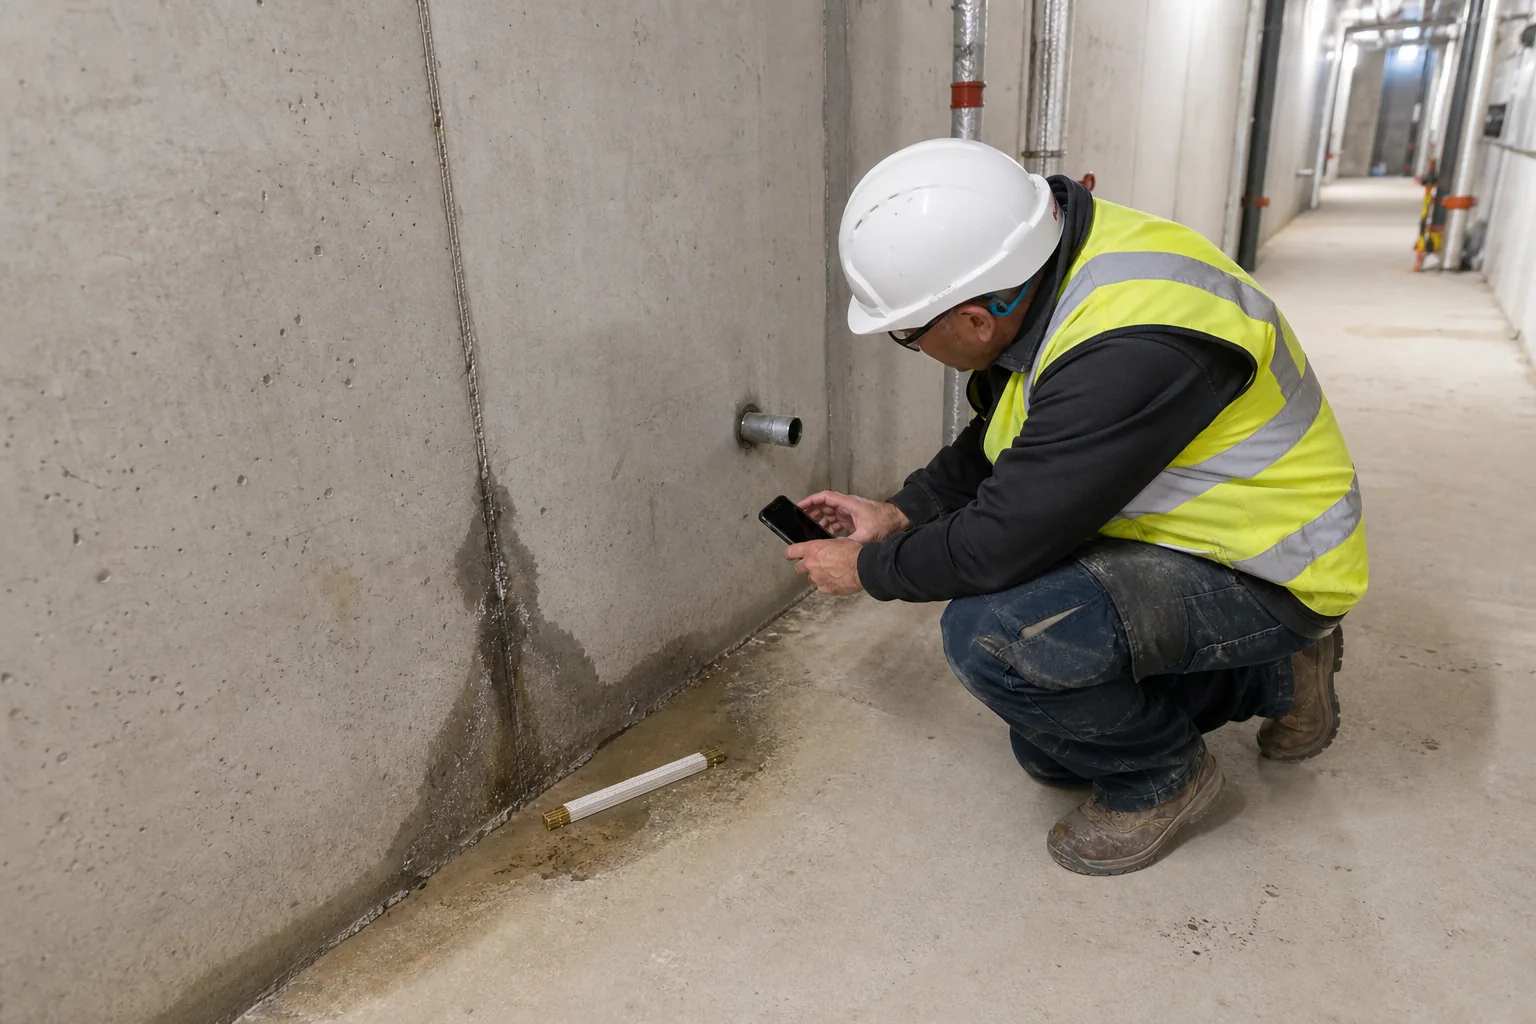
The image shows the observable condition, a scale reference, and enough surroundings to locate it. The cause must be confirmed separately. Photographic recreation generated for this guide.
Issue record template
Field
Useful example
Avoid
Zone and element
Floor -1, technical room, north wall joint
"Basement" without additional reference
Observable fact
Wet spot located at the base of the joint
Assert a cause not yet proven
Date and author
Time of capture and person who carried it out
Forwards without original file or context
Reference
Plan, detail, specification, RFI or applicable act
Compare with an obsolete version
Impact and priority
Affected area, blocked work and agreed urgency
Confusing visibility with technical severity
Next action
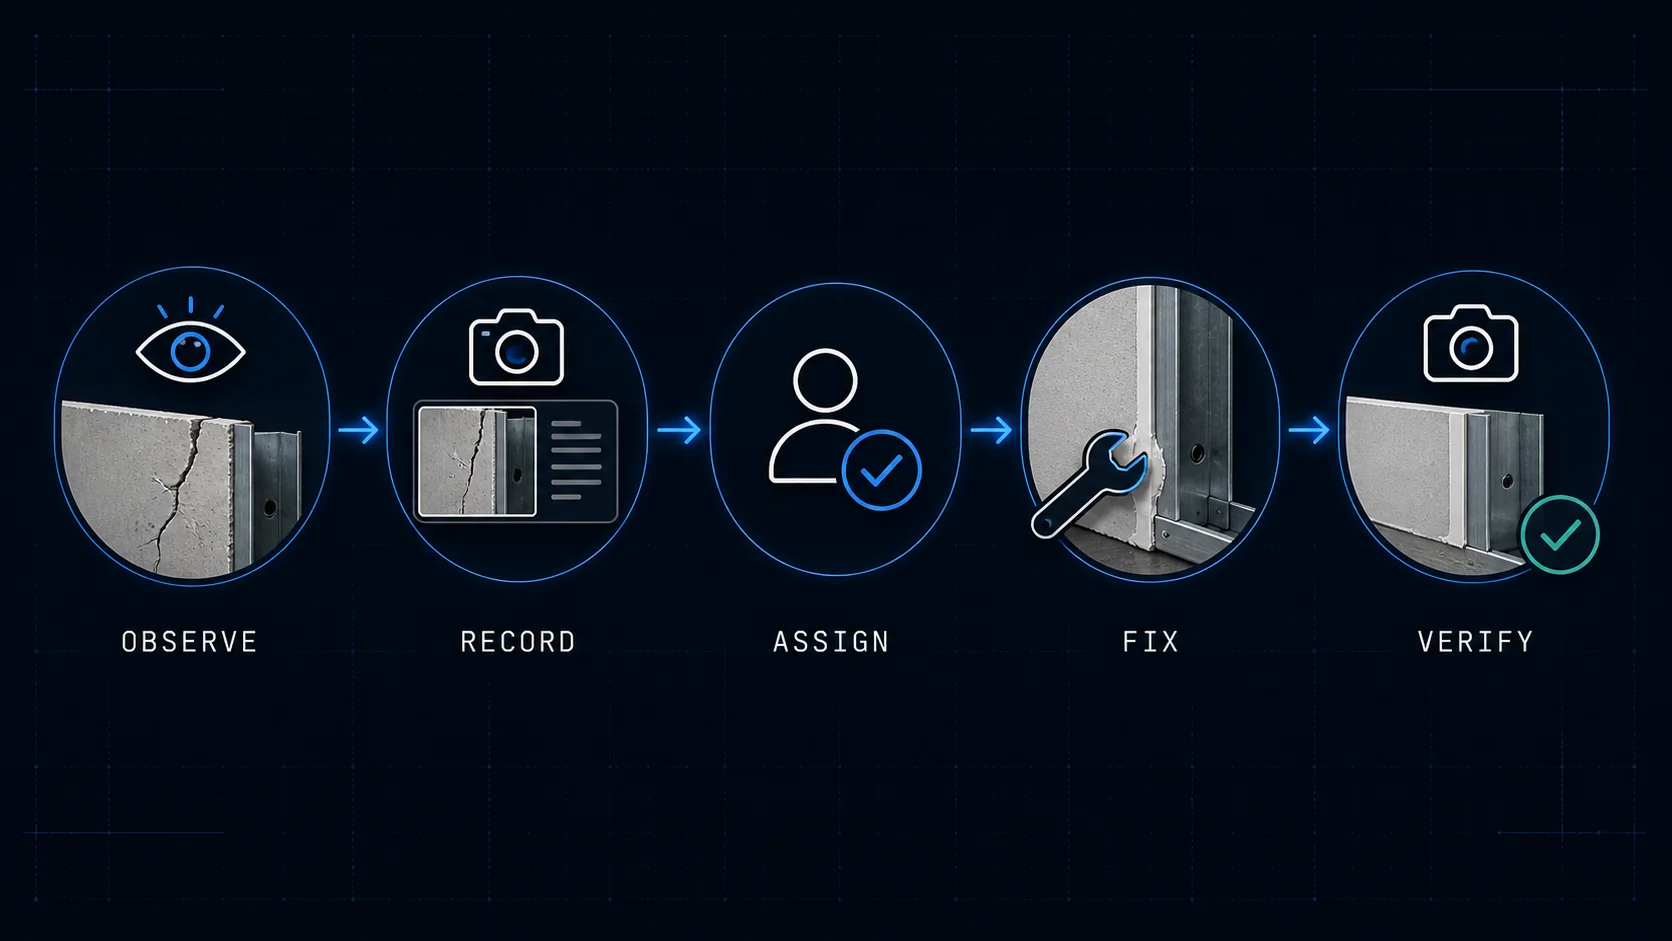
Review origin, assign responsible person and verification date
Save photo without tracking
The evidence is only operational when the finding has responsibility, correction and verification of closure. Illustrative diagram generated for this guide.
Photograph the close-out too
After correction, capture a new sequence from a comparable viewpoint. Record who checked it, when, what scope was reviewed and whether any tests or follow-on work remain. “It's fixed” should not close an issue without proper evidence and validation.
If a finding presents an immediate danger, completing the record is not the priority: follow the site's safety procedure and notify the responsible person. The Health and Safety Executive's HSG150 guide notes that certain equipment must be inspected by a competent person and that identified defects must be corrected, or work stopped until they are corrected.
5. How to apply this method with Pic on Site
Pic on Site serves as the project's visual repository: it helps centralize photos, preserve available context, and find them again. The capture protocol remains necessary; Pic on Site makes it searchable.
1. Create the project and keep the originals
Upload photos without depending on compressed versions of messaging. Check that the date and author are correct.
2. Check the available location data
When the file contains valid GPS, the photo can be placed on a georeferenced map or plan. If there is no GPS, assign a zone or manual reference: the platform cannot invent a reliable coordinate.
3. Review by date, author and area
Use the timeline and filters to gather comparable visits. Maintain a naming of zones consistent with the project.
4. Find images by visual content
Visual search helps narrow down the search—for example, images related to facilities or certain items—but the results should be reviewed before making a decision.
5. Prepare a selection for the technical discussion
Download the relevant images and accompany them with area, date, description, reference and action. A collection of photos is not a substitute for a report or incident log.
Product limit: Pic on Site does not measure quantities, does not approve certifications, does not diagnose building defects, does not generate a contractual As-Built on its own and does not guarantee that a photo covers everything that is outside the frame.
6. What to review at each construction stage
Moment
Priority photos
Review question
Before starting
Previous state, boundaries, accesses, existing elements and sensitive areas
What condition existed before intervening?
Structure
Formwork, visible reinforcement before concreting, supports, openings and connections
What will be hidden or difficult to review later?
Facilities
Service runs, crossings, supports, penetrations and tests before close-up
Can this service be located when it is no longer visible?
Building envelope
Layers, joints, seals, finishes, singular points and weather conditions
Is the detail documented before it is covered?
Finishes
Approved samples, junctions, damage, protection and status by room
Is the difference one of execution, tolerance, damage or cleanliness?
Delivery and closing
Open issue, repair, follow-up tests and comparable final condition
Is there sufficient evidence to verify closure?
Quick checklist for every site visit
I have reviewed the list of areas, milestones and jobs that will be hidden.
Protective equipment and capture route are adequate and safe.
I repeated the key viewpoints from the previous visit.
Each incident has a general view, context and focused detail.
The scale, if necessary, appears without covering the condition.
Date, author, area and documentary reference can be recovered.
I checked focus and exposure before leaving the area.
I have separated observed facts from hypotheses or diagnoses.
Each finding has a person responsible, a deadline and the next verification.
The closing photos have been taken from a comparable frame.
Safety, privacy and retention
Don't change a safe route or enter a restricted area to get a better shot. Avoid distracting workers, approaching edges, passing beneath suspended loads or manipulating protections. If a dangerous condition appears, report it according to the workplace procedure.
Images in which a person is identifiable can be personal data. Define the purpose, access, retention period and sharing rules; avoid faces when they are unnecessary. The European Commission summarizes the GDPR principles: purpose limitation, data minimization, transparency, accuracy and limited retention. Adapt the protocol to the laws and contracts applicable to the project.
Preserve original files, control who can edit them, and record versions used in reports. If evidence may be part of a claim, consult your contractual and legal procedures before renaming, compressing, annotating or deleting files.
Useful terms for further research
These searches help locate protocols, examples, and requirements from other countries. Add the type of project, the discipline or the name of the applicable standard to obtain more concrete results.
Spanish
"photographic monitoring of work", "photographic recording of issues", "control of work progress with photographs", "work photo protocol"
English
“construction progress photo documentation”, “site photo log best practices”, “construction defect photo documentation”, “repeat photography construction progress”
Portuguese
“photographic record of work”, “photographic accompaniment of work”, “photographic report of non-conformity”
French
“suivi photographique de chantier”, “rapport photo advancementment travaux”, “documentation photographique des réserves”
German
“Baufortschritt Fotodokumentation”, “Baustellen Fotoprotokoll”, “Mängeldokumentation mit Photos”
Italian
“photographic documentation of cantiere”, “labor advance photo”, “photographic documentation of the difetti”
Frequently asked questions
How many photos are needed to monitor a construction project?
There is no universal number. Define coverage by area, milestone and risk. Take enough images to preserve overview, context and detail, but avoid accumulating duplicates with no clear purpose.
Can a photo prove the percentage complete on its own?
No. It provides visual evidence of an observed state. Percentage complete must be checked against scope, measurements, programme, inspections and contractual criteria.
How should a construction issue be photographed?
Take an overview, an intermediate context view and a focused detail. Include a scale when it is safe and relevant, and record the date, location, observable fact, reference and next action.
Does Pic on Site automatically detect every issue?
No. It helps centralize, locate and retrieve photographs. Identification and validation require human review and, where appropriate, competent professional judgement.
What if the photos have no GPS data?
Assign an area or manual reference and improve the next capture. Automatic location is only possible when the file retains valid geolocation data.
Turn the protocol into a visual record your team can consult
Pic on Site helps you gather photos by project, retrieve image sequences by date and author, and locate them when valid location context exists. Technical judgement and follow-up remain your team's responsibility.